RIS Data Storage Platforms
storageN
The use of
storageNwithin these documents indicates that any storage platform can be used.- Current available storage platforms:
storage1
storage2
Overview
This is the User Manual for the Wash U IT Research Information Services (RIS) Storage Service.
You can find more information about RIS at: https://it.wustl.edu/services/research-infrastructure-services/
You can learn about the Storage Service at: https://it.wustl.edu/services/research-storage/
Product Stage: General Availability
Assumptions
If you are reading this document, it is assumed that you are a member of the Washington University user community, and that you are related to the research mission of the University. We assume you have a Wash U WUSTL Key Identity, and that you are or work for Research Faculty or Staff. We assume you are on local Wash U computer networks or that you have access to either the Wash U Medical School or Danforth VPN. (See How do I know what network I am on? in the FAQ below.)
The RIS Storage Service is build around the IBM Spectrum Scale product. The product exports a set of network storage protocols including the Server Message Block protocol (SMB). It is assumed that you will access the Storage Services using this SMB protocol (See Known limitations in the FAQ below.)
All users of the Storage Service are expected to have read and comply with the User Agreement:
The Storage Service Workflow
The summary of steps to enable and consume a RIS Storage Allocation is as follows:
You are a Wash U Research Faculty member, or a member of a research team.
You have a Wash U WorkDay Cost Center Number.
You have a WUSTL Key ID.
Visit the RIS Service Desk, the Storage Service section, and begin a Service Request for a new Allocation.
If you are a Faculty member requesting personal space, the Allocation Name will match your WUSTL Key ID.
If you represent a “Research Lab” you can name the allocation after your Lab Name. If so, indicate the name in your Service Request
Indicate the Storage Amount, this is a quota or size limit to the total requested amount of space.
Indicate members of an Access List, this is a list of WUSTL Key IDs that should have access to your storage.
Indicate if you intend to store Protected Data (eg. Personal Health Information, etc.) in your storage allocation.
Indicate your WorkDay Cost Center Number.
When you complete the Service Request, it will enter into the RIS system and a RIS team member will create your Allocation. Once it is created, you access the allocation via the SMB protocol from your own computers.
Optionally, consider sub-dividing your Allocation into Project Subdirectories. These are sub-units of your Allocation that might need different access controls. If you have different data sets that you would like to control access to, call those “Projects” and give them a name. Then indicate an Access List of WUSTL Key IDs that are to have read-write access, and optionally a separate Access List for read-only access.
Features And Options
There are a number of features and options related to the RIS Storage Service.
Integrated with WUSTL Key ID
Integrated with RIS Data Transfer (Globus)
Integrated with RIS Compute services (See this FAQ).
Snapshots
Archive Tier
Active Tier with seamless expansion
Storage Tiers: Archive
We use the word “tier” to refer to a “performance level” of the storage service. Currently there are two tiers, “Active” and “Archive”. The Active tier is the standard storage tier you get by default. It is serviced by a number of different storage pieces including fast memory caching etc., but the way an End User should think of it is “Active storage is where I do daily work”. Think of it like “spinning disks” even though it’s more complicated than “just” spinning disks.
The “Archive” tier is also more complicated than “just” a tape archive. It includes a complex caching layer in order to simplify the end user experience. But it is useful to think of the Archive tier as “Archive storage is where I put things away for long term storage that I am not touching regularly”.
RIS intends to expand tiers in the future to include a “local” tier, that is directly attached to a Compute Service execution node, a “cloud” tier that is connected to cloud services like AWS or GCP or Azure.
Snapshots
Within the “Active” storage tier there is a directory named “.snapshots” that contains one week of daily snapshots of the Active storage space. If files in your Active space get overwritten, corrupted, or mistakenly deleted, you can copy previous versions out of the .snapshots directory back into Active.
Storage Tape Backups
The backup policy for both Active and Archive data has been fully vetted and approved by Office of the Vice Chancellor for Research and the Office for Information Security.
The research storage infrastructure has been deemed compliant with all data retention guidelines.
Integrated into the storage environment is a high performance and scalable tape robot that manages a tape library of 18 petabytes, which allows the shuttling of data from live disk to much less expensive tape and back again on demand.
- For both Active and Archive filesets, data remains on tape indefinitely unless it has been deleted on disk. Active data remains on tape for 30 days after the data has been deleted from disk.
If the data is never deleted from disk, then it remains on tape indefinitely with incremental backups.
Data in Archive also remains on dual copy tape indefinitely unless it is deleted, then it remains on tape for 10 days.
The research storage environment also offers self-service, snapshot data recovery for 7 days.
The preferred method of completed project retention is to request an Archive allocation and once a project is completed, the data can be moved from Active to Archive.
If the data needs to be accessed again after moved to Archive it can migrated back to Active, and it will be restored from tape to disk.
The preferred method of moving data between Active and Archive is to use tar or zip the data and use rsync for movement.
Enabling The Storage Service
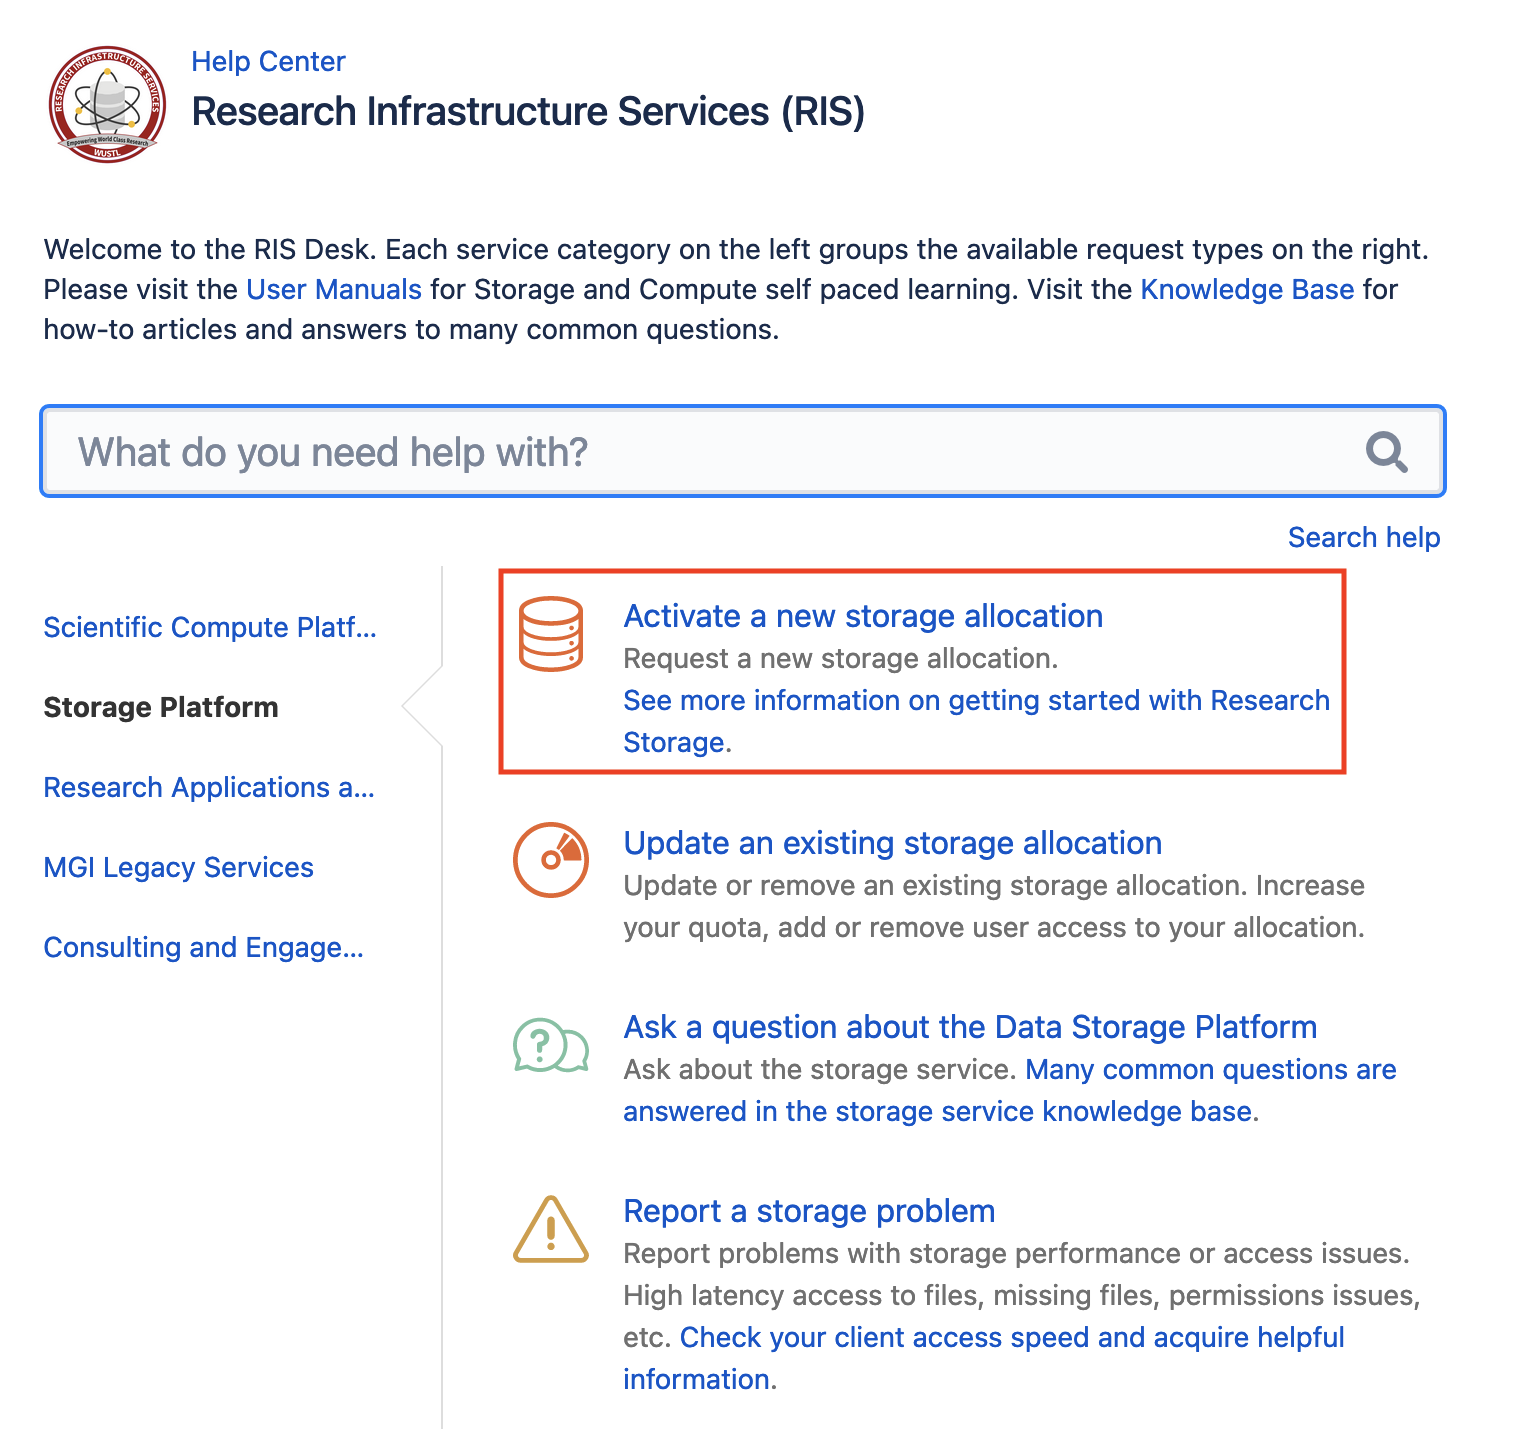
Visit the RIS Service Desk, then on the left, click the Storage Platform section, and begin a Service Request for a new Allocation by selecting Activate a new storage allocation.
If you are a Faculty member requesting personal space, the Allocation Name will match your WUSTL Key ID.
If you represent a “Research Lab” you can name the allocation after your Lab Name. If so, indicate the name in your Service Request
Indicate the Storage Amount, this is a quota or size limit to the total requested amount of space.
Indicate members of an Access List, this is a list of WUSTL Key IDs that should have access to your storage.
Indicate if you intend to store Protected Data (eg. Personal Health Information, etc.) in your storage allocation.
Indicate your WorkDay Cost Center Number.
Please see our documentation for more information on activating a storage allocation
Enabling the Archive Tier
Enabling the Archive tier is done simply by asking for it. Put in a Service Desk request and ask that the Archive tier be enabled for a named Storage Allocation.
Getting Connected
How to connect to storage from MacOS
How to connect to storage from Linux
How to connect to storage from Windows
Designing a Storage Layout
When you connect to your Storage Allocation, there is a standard filesystem layout:
jdoe
    /Active
    /Snapshots
When you’ve asked that the Archive tier be enabled, it will look like this:
jdoe
    /Active
    /Archive
    /Snapshots
When you are storing data that requires different Access Controls, or perhaps funded by different WorkDay Cost Center Numbers, we advise that you leverage Project Directories. These are sub-directories that have their own ACLs that govern access.
Consider a project named “First_Project”. It will contain data that should be read-write for Alice and Bob, but read-only for John and Jane. Submit a Service Desk requests and ask that RIS construct the “First Project” project subdirectory, and create the associated Access Lists:
jdoe/
├── Active/
│   └── First_Project/
├── Archive/
│   └── First_Project/
└── Snapshots/
The Access Lists are populated by WUSTL Key IDs. Two new AD groups will be created on your behalf:
storage-jdoe-first_project-rw : alice bobstorage-jdoe-first_project-ro : john jane
The permissions will be created and managed by RIS such that these access controls are respected on the project subdirectory.
Note
When creating directories or files, it is best practices to avoid using spaces
within the name. If you need to separate parts of a name, it is highly recommended
that you use dashes - or underscores _.
Linux environments do not handle spaces in names well and when it comes to interactions with the Compute Platform, spaces within names of directories and files create issues affecting operation.
There is a 255 character limit on NTFS file name sizes. It is recommended that you be precise in your naming as well. This is a hard limit of the system that the Storage/Compute platform uses. Any files to be transferred to Storage/Compute need to be created following this limit or they cannot be transferred.
Moving Data Into The Storage Service
Compute Data Transfer Policy
Please see our Compute Data Transfer Policy if you will be transferring data to and from your storage allocation using compute1.
CHPC
Instructions for moving data from CHPC
Globus
Instructions for moving data with Globus:
Globus CLI
Instructions for moving data with Globus CLI:
Globus Connect Personal
Instructions for installing and using Globus Connect Personal:
Rclone
gsutil
Instructions for moving data from Google storage with gsutil
Access Control
Instructions for how to manage access to your data in the Storage Service.
Known Limitations
The Storage Service includes a feature set documented in these pages. Each feature or capability has limitations or caveats.
Calculating Free Space
Use SMB to determine free space in a Storage Service Allocation
Every Storage Service Allocation comes with a quota that determines how much data can be stored in the Allocation. Currently, the only way to obtain an accurate and authoritative report of the amount of usable space left is through the SMB interface to this Allocation.
The easiest way to do this is to mount the allocation to your desktop, right-click the mounted folder, and select the appropriate menu option for more information.
Accessing an Allocation through the Compute Service Interface requires that the “Compute Service Integration” Storage Service Feature be enabled for the Allocation. This is usually done when onboarding participating labs to the Compute Service.
The Compute Service Integration feature is implemented with a caching
layer that has its own quota. Because of this, using utilities
to measure free space through the Compute Service Interface will return
misleading information. Tools like df will actually return the
usage of the cache layer, which consumes entirely separate storage.
This caching layer quota may even have the same limit as the Allocation
quota, however they are not the same.
Use a Compute Service shell to determine usage in a Storage Service Allocation
The Compute Service Integration feature is implemented with a caching layer
that has its own quota. Because of this, using utilities to measure free
space through the Compute Service Interface will return misleading information
if used in a non-interactive job. In a non-interactive job, tools like df
will actually return the usage of the cache layer, which consumes entirely
separate storage. This caching layer quota may even have the same limit as the
Allocation quota, however they are not the same.
Obtaining the true usage of a Storage Service Allocation can be accomplished by
using df while connected to the client node or in an interactive job. Shown
below is an example:
$ df -h /storageN/fs1/ris
Tools like du are generic unix utilities to determine usage. To use
du on a Storage Service Allocation that has been enabled in Compute Service,
you will have to include the option --apparent-size for the du unix system
tool command to get the correct usage amount. Shown below is an example:
$ du -sh --apparent-size /storageN/fs1/ris/Active/
Active Directory Group Management
Members May Be Removed From Groups
A change in status or relationship in the university (e.g. changing jobs or departments, resigning or graduating) may trigger an automatic HR/WUIT process that removes a WUSTL Key from any groups. This may cause interruption of access, and may not be automatically restored.
Group Membership Appears Different On Windows or SMB and Compute
AD groups support nested group membership, a feature which is utilized in the RIS Storage and Compute services. On POSIX systems such as RIS Compute clients however, groups will be shown with their nested groups expanded to individual members. So, in Active Directory we may see:
$ adgm storage-ris-itsm-rw
RIS-APPENG
$ accounts.ldapsearch cn=storage-ris-itsm-rw member gidNumber
dn: CN=storage-ris-itsm-rw,OU=RIS,OU=Groups,DC=accounts,DC=ad,DC=wustl,DC=edu
member: CN=RIS-APPENG,OU=RIS,OU=Groups,DC=accounts,DC=ad,DC=wustl,DC=edu
gidNumber: 1250923
While the same group appears in Compute1 as:
$ getent group storage-ris-itsm-rw
storage-ris-itsm-rw:*:1250923:david.prince,shawn.m.leonard,dhallan,jansen,catherine.morie,tz-kai.lin,sleong,cspohl
Ignoring umask
When any file or directory is created with an inherited Access Control Entry (ACE), the POSIX “umask” will be ignored. The umask normally determines basic traditional POSIX permissions on new files. By default, all folders in an allocation will have inherited heritable permissions, and thus display this behavior. In order to have the permissions on a new file reflect the setting of umask, files must be created in directories with ACLs modified to exclude inheritance flags or entries. The relevant vendor (IBM) and IETF (see NFS ACL RFCs) confirm this is the intended behavior. An example of where this might cause an issue is with the usage of git repositories containing permissions settings that conflict with the default ACLs.
Security Implications of SMB
Protocols like SMB evolve over time as a result of feature changes or security vulnerabilities. We expect users to use SMB3.